Web3 isn't just a buzzword, it's the architecture behind decentralized finance (DeFi), NFTs, DAOs, and next-gen digital identity. Traditional Web2 systems rely on centralized servers and opaque logic. Web3 flips this model, putting code and consensus at the center. That means the quality, security, and correctness of your smart contracts are non-negotiable. Learning Web3 coding gives you the superpower to build systems where rules are enforced by math, not trust. Whether you're launching a token or building a DAO, your ability to write and ship secure smart contracts is table stakes.
What Is Web3 Coding?
Web3 coding refers to building decentralized applications (dApps) that interact with blockchain protocols. Instead of servers and databases, Web3 apps rely on smart contracts, self-executing code that runs on a blockchain.
Here's the core stack:
Solidity: The dominant language for writing smart contracts on Ethereum and compatible chains (Polygon, Arbitrum, Base).
JavaScript/TypeScript: Used for frontend development and scripting tasks.
Ethers.js or web3.js: Libraries that connect your frontend to the blockchain.
Hardhat or Foundry: Smart contract dev environments that offer compilation, testing, scripting, and deployment tools.
If you're familiar with Web2 development, think of Solidity as your new backend language, but instead of calling APIs, you're programming a global, immutable state machine.
Step 1: Set Up Your Environment
Install Node.js & npm
These are required for installing and running the JavaScript tooling that supports smart contract development.
To build a real dApp UI, use frameworks like React or Next.js, and libraries like Wagmi or RainbowKit to manage wallet connections.
Common Pitfalls for Beginners
Gas estimation failures
Cause: Reverts inside smart contract logic
Fix: Simulate the transaction in a test, or with eth_call first
Unclear error messages
Cause: Missing custom errors, or lack of require messages
Fix: Use detailed error messages, or named errors in Solidity 0.8+
Not using events
Cause: State changes happen silently
Fix: Always emit events for stateful actions (mint, transfer, vote)
Testing only happy paths
Cause: No coverage for failure scenarios
Fix: Test for reverts, overflows, edge values, permission boundaries
Mixing frontend logic with contract assumptions
Fix: Treat smart contracts as the source of truth, always validate user input before sending transactions.
Next Steps
Use OpenZeppelin contracts: Don’t reimplement ERC20, use @openzeppelin/contracts
Explore Foundry: A faster, Rust-inspired testing tool for Solidity
Learn Fuzzing, Invariants: Use tools like Echidna, Foundry’s invariant testing
Every bug in those postmortems passed through a test suite that didn’t test enough. That’s your bar.
Conclusion: Web3 Coding for Beginners Is About Practice, Not Perfection
Smart contracts are high-stakes software. Mistakes don’t come with rollbacks. That’s why Web3 coding for beginners must emphasize testing, simulation, understanding over fast shipping.
Don’t just copy code. Run it. Break it. Fix it. Repeat. Each test failure is a lesson in adversarial thinking. And that’s the skill that separates script kiddies from protocol engineers.
You don’t need to build the next Uniswap on day one. But if you start now, keep iterating, stay paranoid, you might build something even harder to break.
And it all starts with npx hardhat.
What’s a Rich Text element?
The rich text element allows you to create and format headings, paragraphs, blockquotes, images, and video all in one place instead of having to add and format them individually. Just double-click and easily create content.
A rich text element can be used with static or dynamic content. For static content, just drop it into any page and begin editing. For dynamic content, add a rich text field to any collection and then connect a rich text element to that field in the settings panel. Voila!
Headings, paragraphs, blockquotes, figures, images, and figure captions can all be styled after a class is added to the rich text element using the "When inside of" nested selector system.
Follow-up: Conduct a follow-up review to ensure that the remediation steps were effective and that the smart contract is now secure.
Follow-up: Conduct a follow-up review to ensure that the remediation steps were effective and that the smart contract is now secure.
In Brief
Remitano suffered a $2.7M loss due to a private key compromise.
GAMBL’s recommendation system was exploited.
DAppSocial lost $530K due to a logic vulnerability.
Rocketswap’s private keys were inadvertently deployed on the server.
Hacks
Hacks Analysis
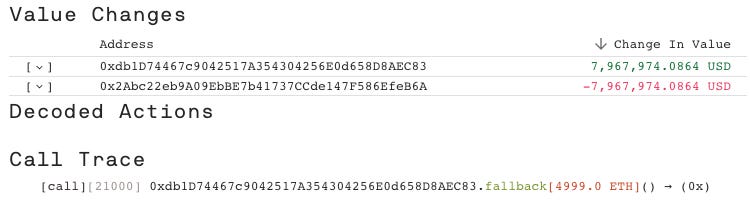
Huobi | Amount Lost: $8M
On September 24th, the Huobi Global exploit on the Ethereum Mainnet resulted in a $8 million loss due to the compromise of private keys. The attacker executed the attack in a single transaction by sending 4,999 ETH to a malicious contract. The attacker then created a second malicious contract and transferred 1,001 ETH to this new contract. Huobi has since confirmed that they have identified the attacker and has extended an offer of a 5% white hat bounty reward if the funds are returned to the exchange.